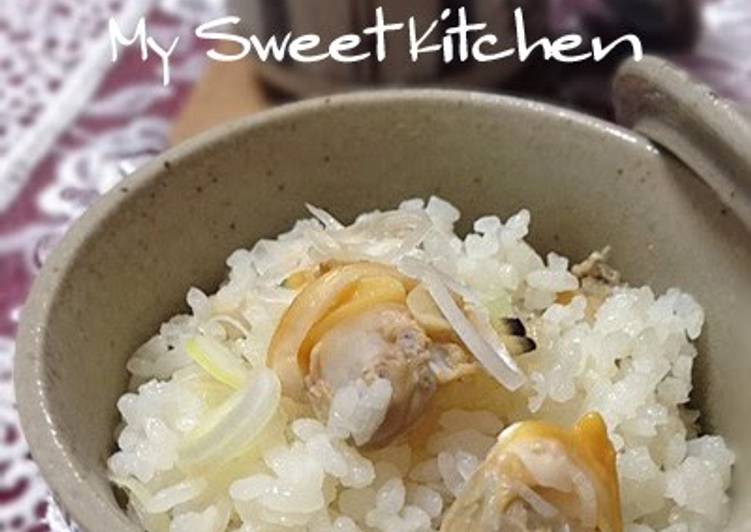
Hey everyone, hope you are having an amazing day today. Today, I will show you a way to prepare a distinctive dish, manila clam seasoned rice. It is one of my favorites. For mine, I am going to make it a little bit unique. This will be really delicious.
Manila Clam Seasoned Rice is one of the most well liked of recent trending meals in the world. It’s easy, it’s fast, it tastes yummy. It’s appreciated by millions daily. They’re fine and they look wonderful. Manila Clam Seasoned Rice is something that I’ve loved my entire life.
To get started with this particular recipe, we must first prepare a few ingredients. You can cook manila clam seasoned rice using 9 ingredients and 26 steps. Here is how you cook it.
The ingredients needed to make Manila Clam Seasoned Rice:
- Make ready 700 grams White rice
- Make ready 35 to 45 Manila clams
- Prepare 300 ml Sake…A
- Take 1200 ml Water…A
- Get 1 tbsp Mirin…B
- Take 60 ml Shiro-dashi …B
- Get 1 Ginger (julienned)
- Get 1 White portion of Japanese leeks (thinly sliced)
- Prepare 1 Kombu for dashi stock
Steps to make Manila Clam Seasoned Rice:
- <2 hours before cooking> Rinse the rice and drain well.
- Preparation <De-grit> Rinse and clean the de-gritted clams very well. Put about 15 in a strainer with a handle.
- De-grit and de-salt the clam properly as this will affect the taste.
- Combine the A ingredients into a big pot that fits the colander from Step 2.
- When Step 4 starts boiling, turn the heat to lower high. Place the Step 2 colander into the pot and agitate.
- If any clam shells open, slightly lift the colander and transfer the opened ones with tongs to another plate.
- After taking out the opened clams, submerge the colander into the pot and agitate again.
- Repeat Steps 5 and 6 with rest of the clams. Watch over as they boil, so as not to overcook them.
- Some clams take longer to open up. You can add a new batch of clams while you wait for the unopened ones to open.
- Now that all of the clams have been boiled, transfer to a bowl.
- Strain the clam juices through a paper towel-lined colander and cool to room temperature.
- Take the meat out from the clams and transfer to another bowl. *It's easier to use an empty shell to do this.
- If the clams are perfectly cooked, the meat will be plump. They're delicious freshly boiled that you won't be able to stop eating them as is.
- Slice the scallion and julienne the ginger as seen in the photo.
- Set the well-drained rice from Step 1 with the ingredients B in the rice cooker.
- Pour the soup from Step 11 to 15 up to the water level marked in the rice cooker. Stir well. Put in the dashi kombu and the ginger from Step 14 and start cooking.
- When Step 16 is cooked, take out the dashi kombu, add in Step 12 and 14. Toss well. *If you can, mix well before serving.
- Serve in a bowl and it's done.
- The soft and plump clams are delicious. The shiro-dashi seasoned rice, white scallion and ginger goes really well.
- [Tip] If you want to cook more clams, increase the amount of ingredients A or repeat the procedure twice or else the cooking liquid will become too salty.
- When I doubled the amount of rice and cooked with 90 clams, I boiled the clams in two separate batches and changed the cooking liquid.
- The remainder of the soup can be kept frozen in a resealable bag.
- Here I made another rice dish with peeled shrimp using the leftover soup. It's also very delicious.
- Marinate the peeled and cleaned shrimps in sake and 1 teaspoon of usukuchi soy sauce for 30 minutes.
- Pat dry Step 24 with paper towels and the rest is the same procedure starting from Step 16 with 60 ml of shiro dashi.
- This is a grilled onigiri using a blowtorch. This is also good.
So that’s going to wrap this up for this exceptional food manila clam seasoned rice recipe. Thanks so much for reading. I am sure you will make this at home. There’s gonna be interesting food in home recipes coming up. Don’t forget to save this page on your browser, and share it to your family, colleague and friends. Thank you for reading. Go on get cooking!